I built mine primarily out of commonly available PVC piping and fittings. I also used some specialty components.
3D Printed Parts (RPG-7 by henry_21pc - Thingiverse):
NOTE: I highly recommend making slight modifications to these before printing
- Front Sight
- Rear Sight
- Rear Grip
- Rocket (two parts) suggest, adding some reference keys to each half for better fitment
- Breech/Exhaust Nozzle
Suggested mods to the files:
- Rocket, on the interior surfaces that get glued together I’d add reference keys to each side for better fitment of the parts.
- Rocket, on the base of the tail (the surface that would side into the muzzle of the laucnher) I’d add a 1.590" dia cylinder that’s at least 3" long. this will allow the rocket to fit securely in the 1-1/2 pipe.
- Breech/Exhaust Nozzle, on the top I’d add a 1.590" dia cylinder that’s at least 3" long. this will allow the rocket to fit securely in the 1-1/2 pipe.
*Add 1/4 holes for dowel pegs in rear grip. - Add a rail for an optic or/and or print sights folded as they’re very fraglie and mine broke on the first outing.
Real parts (commonly found on gunbroker or Numrich)
NOTE: Numrich sells a lot of different real parts that can really add to builds like this.
- Stripped Trigger Assembly
- Trigger Assembly Side Plate
- Trigger Assembly Grips
PVC Parts:
- approx 4ft of 1-1/2" Schedule 40 PVC (buy two 2ft sections
- approx 1ft of 2" Schedule 40 PVC
- one - 2" to 2" Schedule 40 Adapter threaded (https://www.lowes.com/pd/Charlotte-Pipe-2-in-x-2-in-dia-PVC-Schedule-40-Hub-Trap-Adapter-Fitting/3357810)
- two - 2" Schedule 40 Repair Couplings (these are completely smooth inside)
- one - 1-1/2" to 2" Schedule 40 Coupling (https://www.lowes.com/pd/Charlotte-Pipe-1-1-2-in-x-2-in-dia-PVC-Schedule-40-Hub-Adapter-Coupling-Fitting/3132735)
- fitting and pipe for the interior of the gas expansion chamber (I’ll add this as soon as I figure it out)
Misc Parts: EVA foam sheets, glue, screws, 1x2 lumber scraps, 1/4 dowel joint pegs. Ring clamps
The Build:
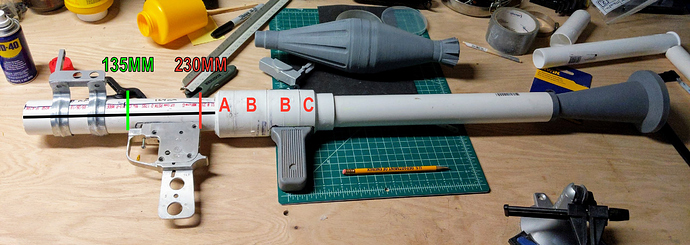
Note: lengths are measured in MM, and from muzzle to breech.
Key:
- A - 2" to 2" Schedule 40 Adapter threaded
- B - 2" Schedule 40 Repair Couplings
- C - 1-1/2" to 2" Schedule 40 Coupling
Muzzle/Trigger assembly.
Note: I’ll add the overall length measurement for this piece once I figure out the Gas Expnasion Chamber
- Cut the first piece of 1-1/2" Schedule 40 PVC to a length of… MM
- From the front of the 1-1/2 PVC opening the trigger assembly should start at 135mm and end around 230mm
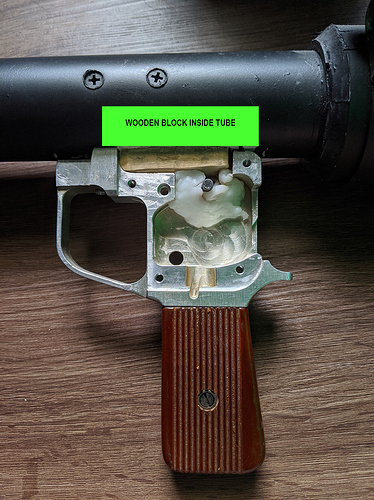
- In order to secure the trigger assembly to the pipe I cut a groove in the PVC and inserted a wooden block. the block will need to be shaped with a Dremel in such a way that a portion fits through the groove in the PVC and fits into the trigger assemble between the side plate. ( see picture)
- Test fit trigger assembly onto the block. Drill pilot holes for screws to attach trigger assemble to block.
- Glue block into PVC
- Affix assemble to block and pipe with screws
Gas Expansion Chamber
- Cut the threading away from part A
- Fit parts A, B, B and C together. Some magic here that I can’t remember right now
- Glue
- With a file, sander or Dremel remove material from the second B and part C, starting from the front edge of the second B and ending at the start of the beveled section of C. The goal is to create a flat surface for the read grip to sit in. Go slowly and remove just enough material to allow the rear grip to sit flush.
- Cut the second piece of 1-1/2" Schedule 40 PVC to a length of… MM
- Glue and Insert 1-1/2" Schedule 40 PVC into
- Drill two 1/4" holes in the rear grip for dowel pegs, insert and glue pegs into place.
- Use marking fluid, paint, or nail polish to mark were holes for pegs should be drilled on the flat surface you made, drill 1/4" holes.
- Add glue to holes you just drilled, insert and glue rear grip to the expansion chamber.
Assemble the two pieces
- The section will be completed once I finish the gas expansion chamber.
Heatshield
- Need to draw a pic here.
TO BE CONTITUNED…


